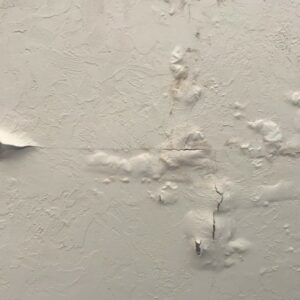
Drywall, also known as gypsum board, is a common building material used to create walls and ceilings in homes. Over time, it’s not uncommon for small holes to appear due to various reasons, such as accidental bumps, nail pops, or wall hangings. Patching these small holes is a straightforward process that can save you the cost of hiring a professional, but hiring professionals from Drywall Medic makes you stressed free of doing this tricky work by yourself. This guide will walk you through the steps needed to repair small holes in drywall effectively. Understanding the common drywall crack causes can help prevent future damage and maintain the durability of your walls. Factors such as settling foundations, fluctuating humidity, or poor installation techniques are often behind these cracks and imperfections. By addressing these underlying issues and following proper repair techniques, you can ensure your walls stay in excellent condition for years to come.
Materials Required
Before you start, you need to gather all the following materials:
- Drywall patch or mesh tape
- Joint compound (also known as mud)
- Putty knife or drywall knife
- Sanding sponge or sandpaper (medium and fine grit)
- Primer
- Paint that matches your wall color
- Utility knife
- Dust mask and safety goggles
Procedure of Patching Small Holes in Drywall
-
Prepare the Area
Safety First: Wear a dust mask and safety goggles to protect yourself from dust and debris.
Clean the Area: Use a utility knife to clean the edges of the hole. This ensures that there are no loose pieces of drywall that could interfere with the patch. Clean the Area: Use a utility knife to clean the edges of the hole. This ensures that there are no loose pieces of drywall that could interfere with the patch. Take care to remove any dust or debris, as a clean surface allows for better adhesion of the repair materials. Common causes of drywall cracks, such as settling of the foundation or changes in humidity, can weaken the surrounding area, so inspect the edges for signs of additional damage. Proper preparation now will help ensure a smoother, longer-lasting repair. If you notice any underlying issues, such as structural movement or water damage, address these problems before proceeding with the repair to prevent recurring damage. Understanding the causes of drywall cracks can help you take proactive steps to avoid future repairs by maintaining stable humidity levels and ensuring the foundation remains secure. With the area thoroughly cleaned and inspected, you’re ready to move forward with applying the patch and finishing the repair.
-
Choose the Right Patch
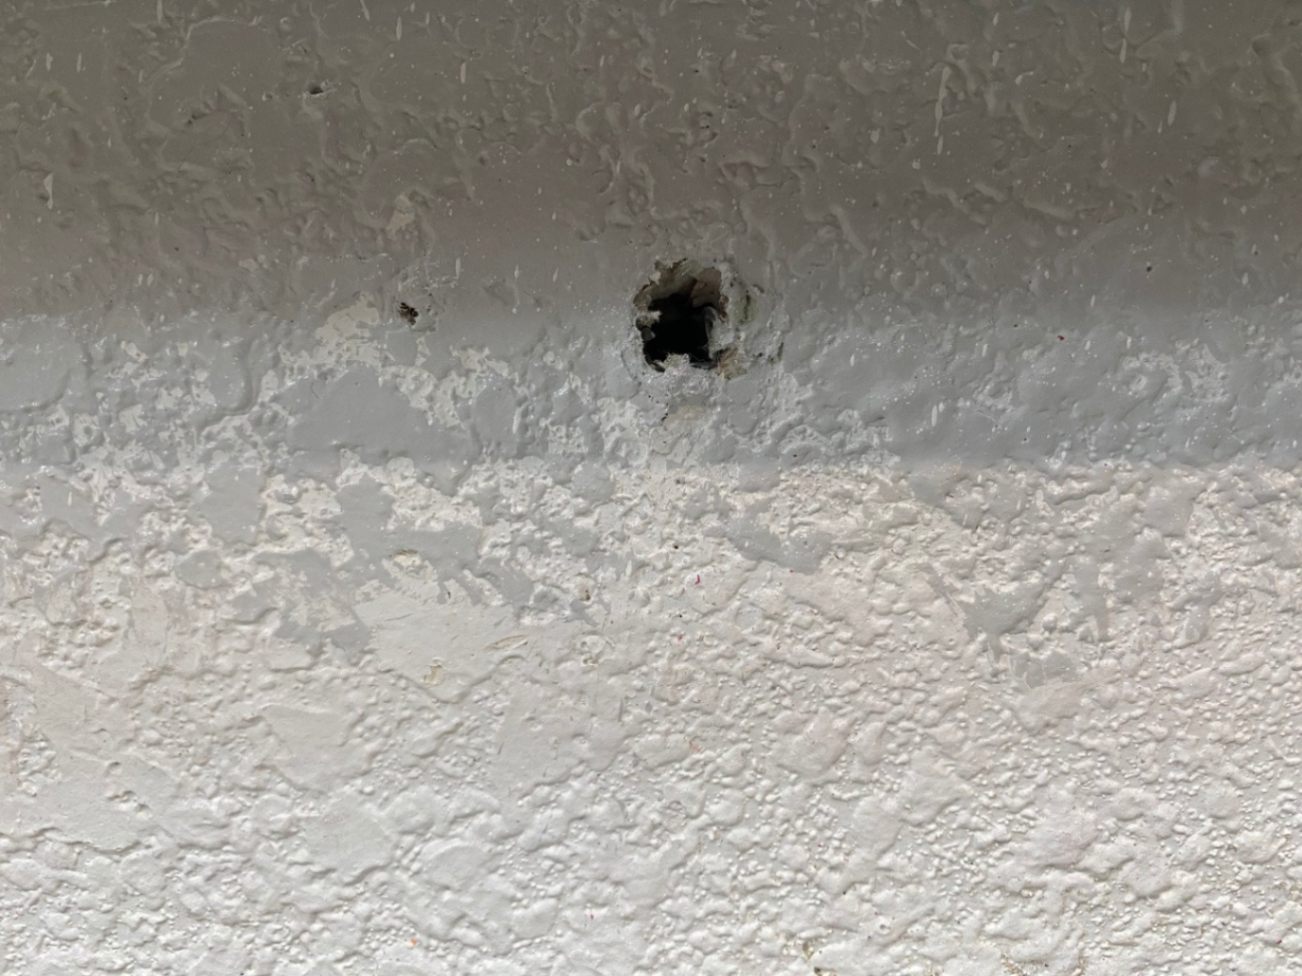
- For holes smaller than 1/2 inch, a little bit of joint compound is usually sufficient.
- For holes up to 2 inches, a self-adhesive mesh patch or a pre-made drywall patch will work best.
- For holes larger than 2 inches but less than 6 inches, use a piece of drywall cut to size, combined with joint compound.
-
Apply the Patch
Small Holes (up to 1/2 inch):
- Using a putty knife, just add a little amount of joint compound to the hole.
- Level it off with the adjacent wall by smoothing it out.
Medium Holes (up to 2 inches):
- Cover the hole with the self-adhesive mesh patch.
- Cover the patch with a layer of joint compound that extends a few inches past the edges.
- Using a putty knife, smooth out the compound, feathering the edges to match the wall.
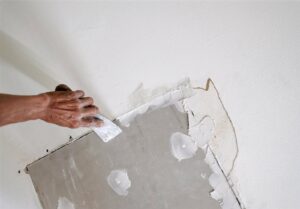
Larger Holes (up to 6 inches):
- Partially cut drywall, making it a little bigger than the hole.
- Lay it over the opening and use a pencil to draw the outline of it.
- Using a utility knife, cut along the outline and remove the damaged section of drywall.
- Using joint compound or mesh tape, secure the new piece of drywall into place.
- Smooth and feather the edges of the patch by covering it with joint compound.
-
Apply Joint Compound
- Put a thin coating of joint compound over the repair for any kind of hole.
- Spread the compound smoothly and evenly using a putty knife.
- To make the composite blend in with the adjacent wall, soften its edges.
- As directed by the manufacturer, let the compound dry completely—typically 24 hours.
-
Sand the Area
- Once the joint compound is completely dry, sand the area with medium-grit sandpaper to smooth out any imperfections.
- Follow up with fine-grit sandpaper for a smoother finish.
- Wipe away dust with a damp cloth.
-
Prime and Paint
- Apply a coat of primer to the patched area to ensure even paint coverage.
- Once the primer is dry, paint over the patched area with the matching wall color.
- Depending on the paint and the area, you might need to apply two coats for complete coverage.
Advice and Techniques
- Technique for Feathering: Spreading the joint compound thinner at the margins and thicker in the center is known as feathering the edges. This method aids in the patch’s flawless integration with the wall.
- Several Layers: To obtain a smoother finish for larger holes, use joint compound in several thin layers.
- Match Texture: You may need to match the texture on your wall if it exists. Either a sponge method or a texture spray can be used for this. Prior to putting it to the wall, practice on a scrap piece of drywall.
- Have patience: Before applying the next layer of joint compound, let the previous one completely dry. This guarantees a robust, seamless finish.
Common Mistakes to Avoid
- Over-sanding: Sanding too much can create a depression in the wall. Sand lightly and check frequently.
- Skipping Primer: Primer helps paint adhere better and ensures an even finish. Skipping this step can result in a noticeable patch.
- Too Much Compound: Applying too much joint compound at once can lead to cracking and uneven drying. Thin, even layers are best.
Conclusion
Patching small holes in drywall is a manageable DIY project that can restore the appearance of your walls and save you money. By following the steps outlined in this guide and taking your time, you can achieve professional-looking results. Whether it’s a minor ding or a more significant hole, with the right materials and techniques, your walls will look as good as new. By investing a little time and effort, you can keep your home looking pristine and well-maintained. You can also take professional help if you feel difficulty doing it, professionals at Drywall Medic have great expertise in these kind of works. If you want to contact them so here are the details: phone: +123-456-7890, email: contact@drywallmedic.com. Additionally, if you’re looking to elevate your space beyond simple repairs, they can assist with cool drywall ideas for your home, adding unique design elements to your walls. From textured finishes to creative accent panels, professionals can help bring your vision to life and enhance the overall aesthetic of your living spaces. …their website provides detailed information on their services, making it easy to reach out for expert assistance. Whether you’re patching a single spot or learning how to hang drywall like a pro, their team ensures flawless results that enhance the beauty of your home. Don’t hesitate to rely on their skills if you’re aiming for seamless repairs or installations. …Phone: (555) 123-4567 or Email: contact@drywallmedic.com. They are skilled at handling everything from minor repairs to major restorations, ensuring flawless results every time. By following perfect drywall finishing steps or seeking assistance from experts like Drywall Medic, you can be confident that your walls will regain their original beauty and durability. phone: 555-123-4567, email: contact@drywallmedic.com, or visit their website at www.drywallmedic.com. Understanding drywall crack causes and fixes is also essential for maintaining the integrity of your walls and preventing recurring damage. Addressing underlying issues, such as settling foundations or moisture problems, can help ensure a long-lasting repair and a flawless finish. Phone: 123-456-7890 and Email: info@drywallmedic.com. While tending to your drywall needs, you can also explore creative home design and decor ideas to complement your newly restored walls. Pairing a flawless finish with fresh paint or unique wall accents can completely transform the look and feel of a room, giving your space a modern and cohesive aesthetic. you can reach out to Drywall Medic through their website or give them a call for personalized assistance. They not only specialize in repairs but can also guide you with helpful drywall installation DIY techniques if you prefer a hands-on approach. With their expert advice and your effort, maintaining your walls has never been easier. By understanding the drywall installation process and utilizing expert tips, you can ensure your project is completed with precision and efficiency. Whether you’re a DIY enthusiast or prefer seeking professional help, having the right support and knowledge makes a significant difference in achieving a polished finish. Drywall Medic’s team is always ready to assist, providing expert advice and services tailored to meet your specific needs. For those who prefer a hands-on approach, Drywall Medic also offers resources to guide you through the drywall installation stepbystep, ensuring you have the confidence and knowledge to tackle the task with ease. Their expert advice, combined with practical tips, can help you achieve a polished, professional finish on your own. Whether you’re repairing, installing, or upgrading, a well-executed drywall project can make all the difference in enhancing the charm and functionality of your home. For those looking to add a touch of creativity, exploring cool drywall ideas for homes can truly elevate your space and make it uniquely yours. From incorporating built-in shelves to designing eye-catching geometric patterns, there are countless ways to use drywall to enhance both form and function. Whether you’re repairing damage or crafting a statement piece, investing in thoughtful design can transform your walls and refresh your living space. By incorporating proper drywall repair tips and tricks, you can streamline your DIY projects and achieve flawless results with minimal hassle. These practical strategies can help you address common issues, like smoothening uneven surfaces or blending patches seamlessly, ensuring a professional-grade finish. With the right guidance and attention to detail, even complex drywall tasks can be executed with ease and confidence.
- Victoria, BC: #136 – 2936 Amy Rd, Victoria, BC, V9B 0B2, Contact Number- 250-880-8849,
- Vancouver, BC: 6894 192 St, Surrey, BC V4N 0B7, Contact Number- 604-913-4656